Restore MySQL Database with cPanel Backup Tool, If you manage a website, chances are you rely on a MySQL database to store critical data such as user information, content, and configurations. Occasionally, you may need to Restore MySQL Database with cPanel due to data loss, server migration, or testing purposes. Fortunately, if your hosting provider uses cPanel, you can easily restore your database using the built-in Backup tool. This guide walks you through the process of restoring your MySQL database using cPanel in a seamless and efficient manner.
Why Restore MySQL Database with cPanel ?
There are several reasons why you might need to restore MySQL Database with cPanel:
- Data Loss: Accidental deletion, corruption, or overwriting of data can necessitate restoration.
- Server Migration: When moving your website to a new server, restoring a database ensures your site functions as it did before.
- Testing and Development: If you’ve been working on updates or changes, restoring a backup can help revert to a stable version.
Whatever the reason, cPanel’s Backup tool provides a straightforward way to restore MySQL Database with cPanel.
Pre-Requisites
Before you begin the restoration process, make sure you have the following:
- A cPanel Account: Access to the cPanel dashboard provided by your hosting provider.
- Backup File: A MySQL database backup file in
.sqlor.sql.gzformat. You can typically generate this using cPanel’s Backup feature. - Database Credentials: The database name, username, and password to ensure proper configuration after restoration.
Step-by-Step Guide to Restoring a MySQL Database
Step 1: Log In to cPanel
Start by logging in to your cPanel account using your credentials. Most hosting providers include a link to cPanel in their customer dashboard or send login details upon account setup.

Step 2: Navigate to the Backup Tool
- Once in the cPanel dashboard, locate the Files section.
- Click on Backup to open the Backup interface.

Step 3: Upload and Restore MySQL Database with cPanel Backup Tool
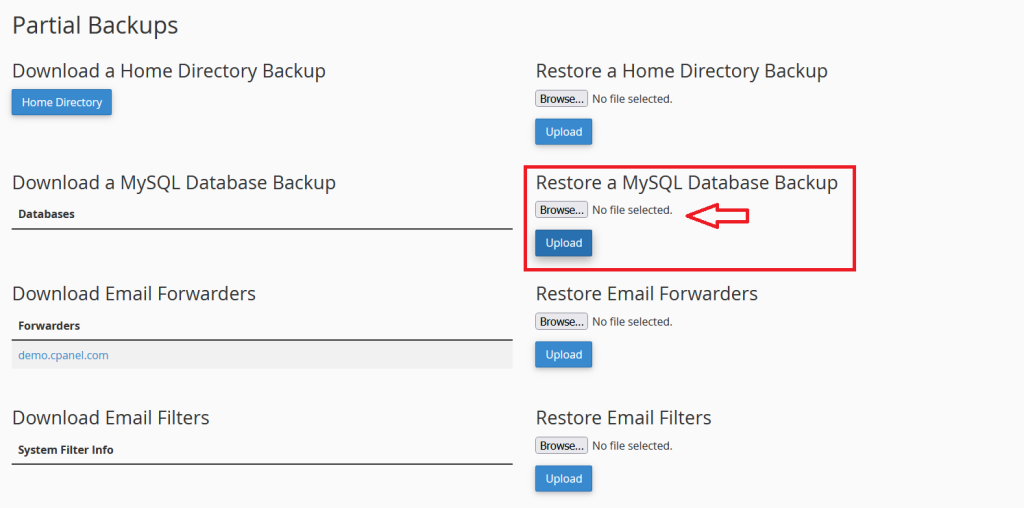
- In the Backup interface, scroll down to the Restore a MySQL Database section.

- Click on the Choose File button and select your backup file from your local device. Ensure the file is in the correct format (e.g.,
.sqlor.sql.gz).

- Once the file is selected, click on the Upload button to begin the restoration process.

Step 4: Wait for the Restoration to Complete
Depending on the size of your database and your server’s speed, the upload and restoration process may take a few moments. Once completed, you should see a confirmation message indicating the database has been successfully restored.
Alternative Method: Using phpMyAdmin
If you encounter issues with the Backup tool or prefer another method, phpMyAdmin is an excellent alternative. Here’s how:
- In cPanel, navigate to the Databases section and click on phpMyAdmin.
- Select the database you want to restore from the left-hand panel.
- Click on the Import tab at the top of the page.
- Use the Choose File button to upload your
.sqlor.sql.gzfile. - Click on Go to begin the import process. Once completed, a success message will appear.
Post-Restoration Checklist
After restoring your database, follow these steps to ensure everything works correctly:
- Update Configuration Files: Check your website’s configuration files (e.g.,
wp-config.phpfor WordPress) to ensure the database name, username, and password are correct. - Test Your Website: Navigate to your website and test its functionality. Check key areas like login forms, content pages, and user interaction features.
- Verify Data Integrity: Use phpMyAdmin to browse your database and ensure all tables and data have been restored correctly.
Tips for Managing MySQL Backups
- Automate Backups: Use cPanel’s backup scheduling feature or plugins to automate regular backups.
- Store Backups Securely: Keep backups in a secure location, such as an external drive or cloud storage.
- Test Backups: Periodically test your backups by restoring them to ensure they’re functional and complete.
Restoring a MySQL database using cPanel’s Backup tool is a simple and efficient process that minimizes downtime and data loss. By following this step-by-step guide, you can restore your database with confidence and ensure your website runs smoothly. Regularly creating and testing backups is vital for maintaining data integrity and preparing for unforeseen events. With cPanel’s intuitive tools, managing your MySQL database has never been easier.
